Sunday, February 24, 2013

Homemade Bagels

I love bagels... especially topped with cream cheese or cream cheese and jam. YUM. I learned how to make them in my kitchen meeting that I go to once a month. If you make bread and rolls they aren't that hard. There are just a few extra steps involved but they are sooooooo worth it! Store bought bagels always leave me with a heavy feeling in the mornings so I usually only eat 1/2 of one. But these are light and so delicious I could eat two!!! I don't think I will ever buy them again. I followed the recipe just exactly how it is. But next time, I may add cinnamon or cinnamon chips and raisins?? you could even add a little grated cheese to the dough for a cheesy bagel, or chopped sauteed onions, or sun dried tomatoes...the possibilities are endless!!! Enjoy!

Homemade Bagels
3 cups warm water
1/3 cup sugar
2 Tablespoons yeast
3 cups white whole wheat flour
3-4 cups white all-purpose flour
4 teaspoons salt
1 egg white
poppy seeds and sesame seeds for topping

In a heavy duty mixer bowl, whisk together the water, 1/3 cup sugar and yeast; let rest for about 5 minutes or until it starts to foam and get bubbly on the top (that way you know your yeast is working). Add 3 cups white whole wheat flour and salt, mix one minute to incorporate the flour. Then start adding 3 more cups of the white all purpose flour a little at a time until the dough is soft and elastic, about 8 more minutes. (you may need to add a little or all of the other cup of flour, it depends on the weather and where you are located) you want your dough smooth and elastic with just a little stickiness. Pour your dough (or plop might be a better word) out onto a floured surface, cover with a dish towel and let raise for about 20 minutes.
Divide your dough into 16 equal portions, then shape the bagels by first shaping the dough into a ball, then inserting your thumb through the middle of the dough ball to form a doughnut-shape. They need to be about 1 inch thick, so stretch the hole a little and pull so they are about 3 inched across and the hole is a good size; then place the bagel on a lightly greased (or parchment lined) baking sheet. Repeat with each dough ball, then cover the bagels and allow them to rise another 20 minutes.
This is what they look like after raising for 20 minutes.
While your bagels are raising this last time, bring 8 cups of water to a boil in a large pot; then add 3 Tablespoons sugar to the water. Preheat your oven to 400 degrees. Whisk together your egg white with 1 tablespoon of water; set aside along with the poppy seeds and sesame seeds so that everything is ready.
When the bagels have risen, carefully remove them from the baking sheet and place them upside down in the boiling water. I do 3 at a time as the expand just a bit while boiling.
Boil them for 30 seconds then turn them over and boil another 30 seconds. Remove the bagel and allow them to drain on a dish towel a bit.
Carefully transfer to a lightly greased (or parchment lined) baking sheet. Brush them with the egg wash  and sprinkle with the desired topping. ( I left some plain, and topped some with poppy seeds and sesame seeds)
Bake your bagels in preheated oven for 15 to 20 minutes or until golden brown. Enjoy warm from the oven with cream cheese and jam or whatever you like.
Let the rest cool completely before placing in a Ziploc baggie.

Saturday, February 16, 2013

Easy "Fried" Ice Cream

I have always wanted to make fried Ice Cream.... I have had it before in Mexican Restaurants and it's sooooo good! But thinking about getting out my fryer and then freezing the ice cream scoops before hand and then frying them seemed like a lot of work and like it would end up being a big mess. I ran across this recipe here but I tweaked it a bit by adding brown sugar.... there was no sugar in the recipe and I thought it needed it. Also I cut back a bit on the butter, one whole cube just seemed like way too much! Next time I make this I'm going to quick fry a flour tortilla and sprinkle that with cinnamon sugar to set the fried Ice cream on. This is soooo delicious! I made normal size Ice cream scoops, and I got about 5 or 6 servings out of the cornflake mixture. ENJOY!

Easy 'Fried" Ice Cream
Prep Time: 10 minutes
Yield: 3-5 Servings
Ingredients:
5 cups corn flakes cereal*
6 tablespoons butter
2 teaspoons ground cinnamon
2 Tablespoons brown sugar

Vanilla bean ice cream, firm enough to shape but just soft enough to scoop

Optional servings suggestions:
honey or caramel sauce
chocolate fudge sauce
cherries, fresh or Maraschino, for garnish
Whipped Cream

Directions
Pour cornflakes into a large Ziplog bag, seal bag and use a rolling pin to crush cornflakes. Melt butter in a non-stick 10-inch fry pan over medium heat. Once butter is melted, stir in crushed corn flakes,cinnamon and and brown sugar; increase heat slightly. Cook mixture, stirring constantly until golden brown and fragrant (color will deepen and begin to smell lightly toasty and corn flakes should be crisp), about 2 minutes. Remove from heat, pour mixture in a shallow dish and allow to cool slightly. Use a fork to break mixture down if desired.

Remove ice cream from freezer, scoop out desired serving size (you should be able to get 3 baseball size ice cream balls, or more if you do a thinner coating or smaller size ice cream balls) and shape into a ball with clean hands (yeah, it will be seriously cold, like rolling a snowball without gloves so work quickly. If you don't care to have a uniform shape then you can simply just scoop out the ice cream and drop into toasted corn flake mixture without shaping), then immediately drop shaped ice cream ball into corn flake mixture and roll to evenly coat, while pressing corn flake mixture around outer surface for a thicker coating as desired. Serve immediately topped with optional toppings, or place in freezer in an airtight container (without toppings) and chill until serving.

*You could also replace some of the corn flakes with sweetened shredded coconut or finely chopped pecans.

Sunday, February 10, 2013

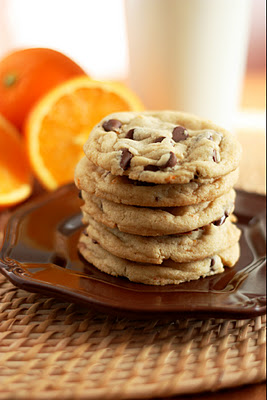
Orange Chocolate Chip Cookies (tastes just like an Orange Milano, but better!)

I LOVE those Pepperidge Farm Orange Milano cookies! They remind me of when I shared an apartment with my sister before I was married, and we'd splurge and get those all the time!! I think I could eat a whole package! I had tried a copy cat version of Orange Milano cookies, but after wasting 2 or 3 hours trying to make them and using 7 egg whites and not to mention butter and chocolate chips I ended up throwing them away. The texture was chewy and they were really flavorless. THEN!!! one day browsing pinterest and multiple recipe sites I found this recipe here ( I LOVE this recipe blog by the way)  and I HAD to give this recipe a try... and WOW! they taste just like Orange Milano cookies only better!!! because after all, they are a chocolate chip cookie. And who doesn't love chocolate chip cookies!!! You definitely need to try this recipe out! YUMMO! (I ate all my cookies before I remembered I hadn't taken a picture of them, so I borrowed the one from the original recipe.) My dough was a little dry so I also added a couple of Tablespoons of fresh squeezed Orange juice, it helped and just enhanced the Orange flavor I think.

Orange Chocolate Chip Cookies (tastes just like an Orange Milano, but better!)
Yield: 4 dozen
Ingredients:
3- 1/4 cups all-purpose flour
2 teaspoon cornstarch
1 teaspoon baking powder
1/2 teaspoon baking soda
1 teaspoon salt
1 cup butter, softened
1 cup granulated sugar
1 cup packed light-brown sugar
2 large eggs
1 Tablespoon vanilla extract
1 -1/2 teaspoons orange extract
1 Tablespoon orange zest
1 Tablespoon orange juice (IF the dough is dry, if it's a good consistency leave out)
1 cup milk chocolate chips
1 cup semi-sweet chocolate chips

Directions:
Preheat oven to 350 degrees. In a mixing bowl, whisk together flour, cornstarch, baking powder, baking soda and salt, set aside.
In the bowl of an electric mixer, whip together butter, granulated sugar and brown sugar until light and fluffy, about 3-4 minutes. Stir in eggs 1 at a time mixing after each addition. Mix in vanilla extract, orange extract and orange zest. Slowly add in dry mixture and mix until well incorporated. Add a Tablespoon or 2 of juice from the orange if your dough is on the dry side, mine was a little. I think it adds a little more orange flavor.
 Gently stir in milk chocolate chips and semi-sweet chocolate chips. Drop cookies by heaping tablespoonfuls onto a buttered or parchment paper lined cookie sheet and bake 9-11 minutes. Allow to cool on cookie sheet several minutes before transferring to a wire rack to cool completely.


 recipe adapted from http://www.cookingclassy.com

Saturday, February 9, 2013

Swiss Steak with Tomato Gravy

Swiss Steak with Tomato Gravy
I LOVE  Swiss Steak.... there are many different versions of it and different recipes for it out there. My Mother made a completely different kind of Swiss steak with brown gravy which will forever be one of my favorite comfort foods, while my mother in law made a delicious version with steak and Stewed tomatoes. I was watching Cook's Country on our PBS station a while back and they made this  recipe using a roast that they cut into steak size pieces, and cooked in the oven. I couldn't find the exact roast that they used in their recipe at my local grocery store but I found a good sized cheaper roast and cut that into steak size pieces. This recipe turned out delicious with enough of the gravy to go on creamy mashed potatoes!! YUMMO!!!! Serve this with some steamed veggies for your Valentine this week and you've got an awesome dinner! The steak is delectably tender and rates right up there with any expensive steak dinner that you could make or get in a restaurant for that matter.  Enjoy!

Swiss Steak with Tomato Gravy
Adapted From Cook's Country
Serves 6 to 8
**NOTE: Top blade-roast may also be labeled chuck roast first cut, top chuck roast, flat iron roast, or simply blade roast. Use low-sodium chicken broth or the gravy will be too salty.

Ingredients
1 (3 1/2-to 4-pound) boneless top blade roast (see note**) Any cheaper cut roast will do...
Salt and pepper
2 tablespoons vegetable oil
1 onion, halved and sliced thin
3 garlic cloves, minced
1/2 teaspoon dried thyme
2 tablespoons tomato paste
1 tablespoon all-purpose flour
1 (14.5-ounce) can diced tomatoes
1- 1/2 cups low-sodium chicken broth
1 tablespoon sun-dried tomatoes packed in oil, rinsed, patted dry, and minced (I didn't rinse)
1 tablespoon finely chopped fresh parsley

Instructions:
1. BUTCHER ROAST Adjust oven rack to middle position and heat oven to 300 degrees. Following photos below, cut roast crosswise into quarters and remove line of gristle to yield 8 steaks. (Like I said, I couldn't find the exact roast but I did cut mine like they did below, I just didn't have a line of gristle that I was trying to get rid of).
2. BROWN STEAKS Pat steaks dry with paper towels and season with salt and pepper. Heat 1 tablespoon oil in Dutch oven over medium-high heat just until smoking. Brown 4 steaks, about 3 minutes per side. Transfer to plate and repeat with remaining oil and steaks.
3. ADD AROMATICS Add onion to empty pot and cook until softened, about 5 minutes. Add garlic, thyme, tomato paste, and flour and cook until fragrant, about 1 minute. Stir in diced tomatoes and broth and bring to boil.
4. BRAISE STEAKS Return steaks and any accumulated juices to pan. Transfer to oven and braise, covered, until steaks are fork-tender, about 2 hours. (I braised mine in a 275 degree oven for 3 hours while I was at church! Turned out great!)
Transfer steaks to platter, tent with foil, and let rest 5 minutes. Skim fat from sauce. Stir in sun-dried tomatoes and parsley heat until just beginning to bubble. Season with salt and pepper. Pour sauce over steaks. Serve.
How to Butcher a Blade Roast:
Top blade roast, a shoulder cut with great flavor, has a pesky line of gristle that runs horizontally through the center. Follow these simple steps to remove it and cut perfect Swiss steaks.
1. Place roast on cutting board and cut crosswise into four even pieces.

2. One piece at a time, turn meat on its side to expose the line of gristle that runs through its center.

3. Remove by slicing through meat on either side of gristle to yield two "steaks." Repeat with remaining pieces of blade roast to yield a total of eight steaks.

Saturday, February 2, 2013

Happy Super Bowl Sunday

What's everyone cooking for Super bowl food??? I'm making Buffalo Wings (recipe here)  and my Chicken Club Pizza ( recipe here) and trying my hand at fried ice cream. If it turns out I will post that recipe later..I also made Football cookies for a party we had a work....
They were fun to make!! For a cookie cutter I used a mason jar lid that I had bent to the shape of a football. I also used those cute googly eyes that you can find in the Wilton cake decorating section at Walmart or Michaels. FUN!!  I used this Sugar Cookie recipe, it's my new favorite one. Aren't they cute??? You almost don't want to eat them.... but we did. Have a great day!

Frosted Peanut Butter Cookies

                              Original recipe                                       
                                                      Mine with chocolate Ganache
I found this recipe on one of my favorite recipe blogs.... but I can't remember which one. They were delicious! BUT I did eat only one or two and then sent the rest with my hubby to that Youth activity that he took the Butterfingers cookies to. As you can see, I did tweak mine just a bit by topping with chocolate Ganache instead of Chocolate frosting. Reason being, the chocolate frosting recipe looked like it made a lot, and I didn't want extra frosting leftover, plus it was late in the evening and I just didn't want to mix up any more frosting. I love chocolate ganache...it's easy and easy to spread but as it cools it thickens. I will post how I make ganache and you can decide how you want to make these cookies, I know the Ganache iced ones may not be quite as pretty but... they are YUMMO! Loved this recipe though, I think I could have eaten the entire bowl of peanut butter frosting all by myself right then... so good! Oh also note that there isn't any Peanut Butter in the dough itself, but with the Peanut Butter chips and Peanut Butter icing, you really think it's in there! These would be good to make for your special Valentine I think. Enjoy!
Frosted Peanut Butter Cookies
1 cup butter, room temperature
1 cup brown sugar
1 cup white sugar
1 teaspoon salt
1/2 teaspoon baking powder
1/2 teaspoon baking soda
1 teaspoon vanilla
2 eggs
3 1/4 cups cake flour
1- 12 oz bag Reese's Peanut Butter chips (no substitutions)

Pre-heat oven to 350 degrees and place rack in center of oven.
Cream together butter, sugars, salt, baking soda and powder. Add vanilla and eggs. Mix well.
Add flour and mix just until flour is blended in. Stir the chips in by hand.
Using a cookie scoop or ice cream scoop, or just a large spoon, scoop into 2 inch balls and place on a parchment lined cookie sheet about 4 inches apart. I bake about 8 cookies per sheet. (I did mine slightly smaller and baked for about 10 minutes.)
Bake for about 12 minutes, or until set.

Peanut Butter Frosting
1/2 cup butter, soft-room temperature
3 cups powdered sugar
1/2 cup peanut butter (not natural)
milk to thin to proper consistency (whole milk is best)

Cream together room-temperature butter and powdered sugar. Add peanut butter and beat until smooth. Add milk a tablespoon at time, just until frosting is smooth , creamy and spreadable. Set aside.

Chocolate Frosting
1 cup butter , room temperature
5-6 cups powdered sugar
1/4 cup unsweetened cocoa
1 tablespoon vanilla
1/4 to 1/3 cup milk
Cream butter and 5 cups powdered sugar. Add cocoa and vanilla. Add milk a tablespoon at a time until frosting is smooth. If needed, add more powdered sugar.

After cookies are cooled, frost with peanut butter frosting. Then frost on top of the peanut butter frosting with the chocolate frosting. When spreading the chocolate frosting on top of the peanut butter frosting, be very gentle and leave a small space between the edge of the peanut butter frosting and the chocolate frosting for a layered frosting look (see photo).

OR you can top with chocolate ganache. Either is great!
Chocolate Ganache
1/2 cup Heavy Cream
1 cup Milk chocolate chips (or semi-sweet works too)
In a microwave safe bowl, heat cream for about 45 seconds to a minute, you want the cream on the sides of the bowl to just become bubbly. Remove from microwave and add in the chips. Distribute with the back of a spoon so all the chips are covered with the warm cream. Let sit for a minute; then stir until combined and smooth. At first you will think it's not turning out, but the more you stir, the creamier it gets. Let cool for about 10 to 15 minutes or until thickened. You can either put this in a decorator bag and top the cookies or you can just use a spoon and top the cookie, smoothing with the back of the spoon.
ENJOY!
By the way... I love using Ganache to top a cake that's been iced with butter cream frosting....
Doesn't it just make the cake look more sinfully delicious?

New and Improved Chicken Enchilada Soup

I have a few different Chicken enchilada / chicken tortilla, and different chicken soups on here, but I did a few things different yesterday...